Modern POS - Point of Sale with Stock Management System
Thanks for purchasing
Hi Please read the documentation properly If you have any questions that are beyond the scope of this documentation, please feel free to contact us via the comment section on codecanyon.net or email us at itsolution24bd@gmail.com
Our support working hours are listed in GMT+6 below:
► Sunday to Thursday : 9:00 AM to 5:00 PM
► Response time Upto 2 days.
► Friday & Saturday is Closed.
Overview
- If you want to store all data in your computer so You can use XAMPP or wamp for Windows Operating System and MAMP For Mac operating system
- If you want to store all data on the internet so contact us we will set up everything quickly.
- Your all data will be 100% secured if your computer doesn't work or damage.
- You can see all information from everywhere about your shop.
- You can see all information by using your Mobile phone.
- You can monitor your shop from home.
Advantage of using internet for data store
Process of Installation
Pre-Requirements
- Internet connection(Mandatory)
- Create a new database , Make sure database is completely blank
- if you install it in subdirectory ,change the subdirectory value in config.php .
define('SUBDIRECTORY', 'modernpos'); - The maximum execution time of your server can't be less than 5 minutes. You may update php.ini file for this
- To get Installation service from our Expert Support Team contact us at itsolution24bd@gmail.com
You have to follow this article carefully
1st : Install a software according your Operating System
Installation of WAMP for Windows
- Downlaod and install WAMP software in your computer
- Go to c: drive > WAMP folder> www folder > paste modernpos folder(This you will get in our package).
- Run WAMP software
Installation of XAMPP for Windows
- Download and install XAMPP software in your computer
- Go to c: drive >XAMPP folder> htdocs folder > paste modernpos folder(This you will get in our package).
- Run XAMPP software and start Apache and MySQL from XAMPP control panel
Installation of MAMP for MAC
- Go to the link and download MAMP. Once the download is finished, open the downloaded file. Drag and drop the image file inside it to your Applications folder.
- Paste modernpos folder (This you will get in our package) your MAMP document root folder
- Run MAMP
Installation of LAMP for Linux
- Go to the link and download LAMP. Once the download is finished install it.
- Paste modernpos folder (This you will get in our package) your LAMP document root folder
- Run LAMP
2nd : Follow this step
- Visit YOUR_INSTALL_PATH/install here you will get Six step for installation.
- Visit http://YOURDOMAIN.COM/modernpos/install ( if you install it on online server)
-
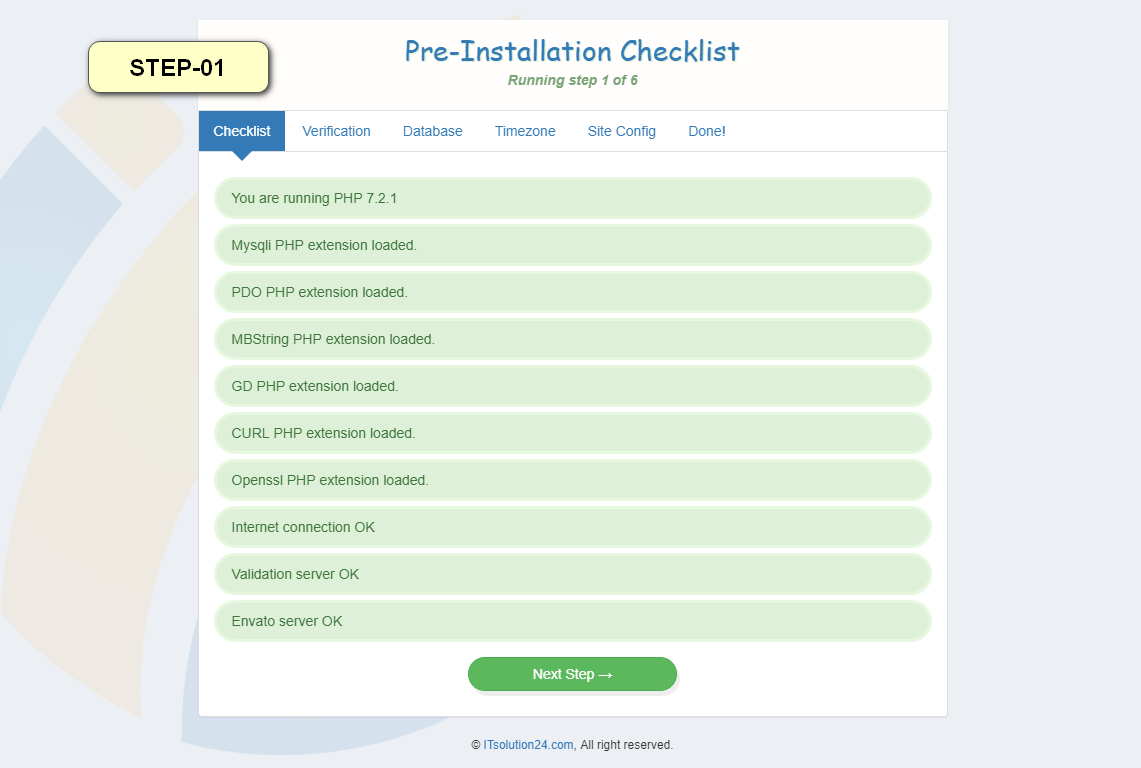
STEP-01 : You can see a requirement list, after full-fill the requirement click Next.
-
STEP-02:
a) Use your envato login username
b) Use your product purchase code Where i will get this?

-
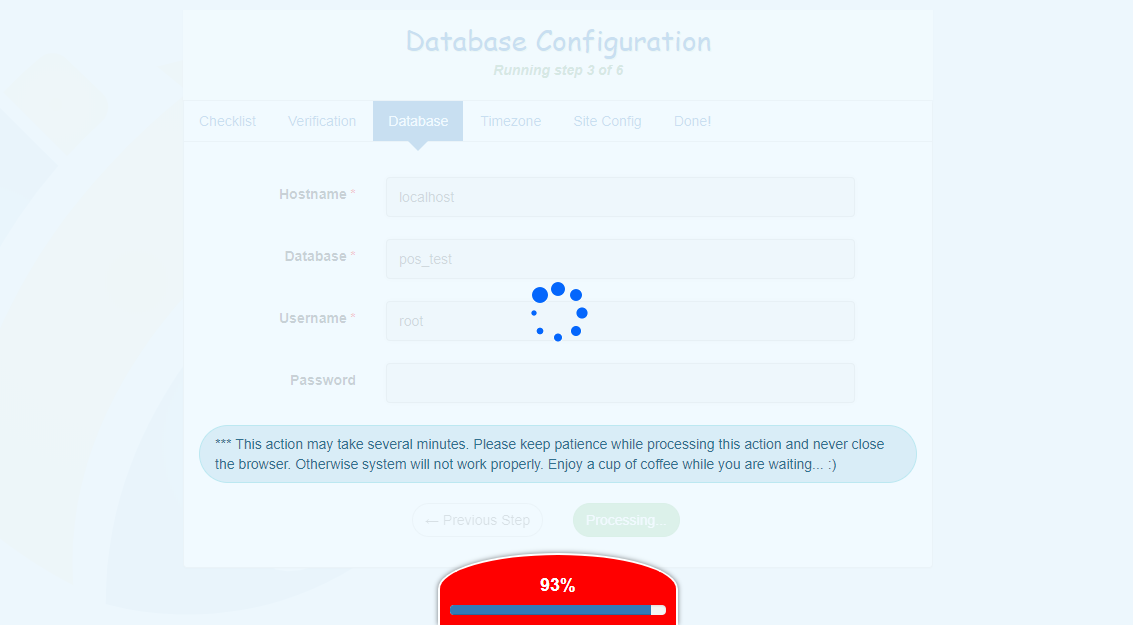
STEP-03:
a) Provide Hostname localhost(if you are installing in your pc).
b) Create a database(you have to create a database before starting the installation process)
c) Provide database username.
d) Provide database password.
e) Database port (default is 3306, you can change if need)
f) Next step
It may take sometime
-
STEP-04:
a) Select time zone of your country.
b) Next step.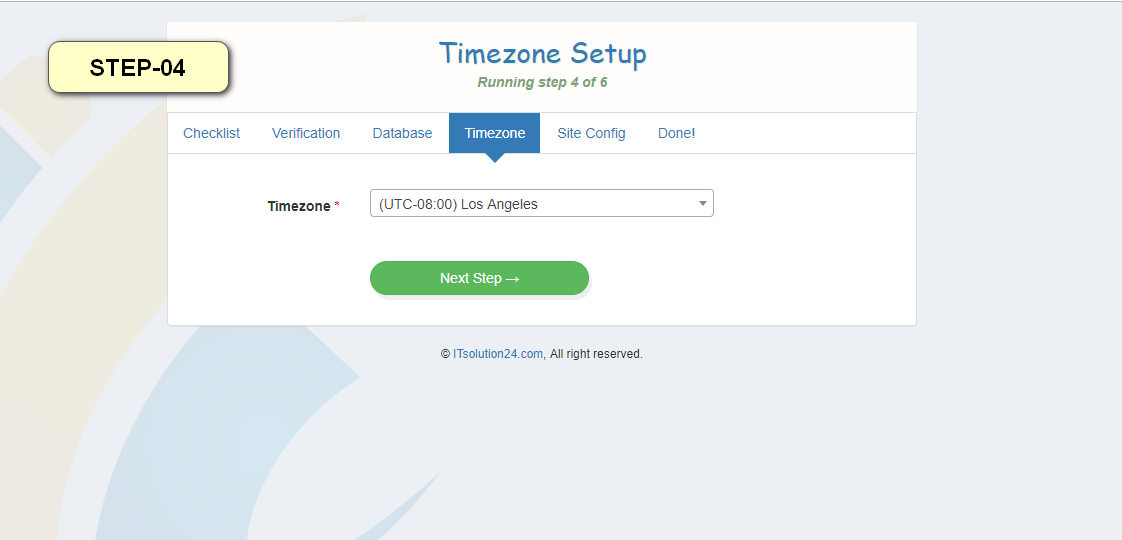
-
STEP-05:
a) Your store name
b) Your store contact number
c) Give your username
d) Give your password.
e) Provide your shop address (this will be displayed on invoice).
f) Next step.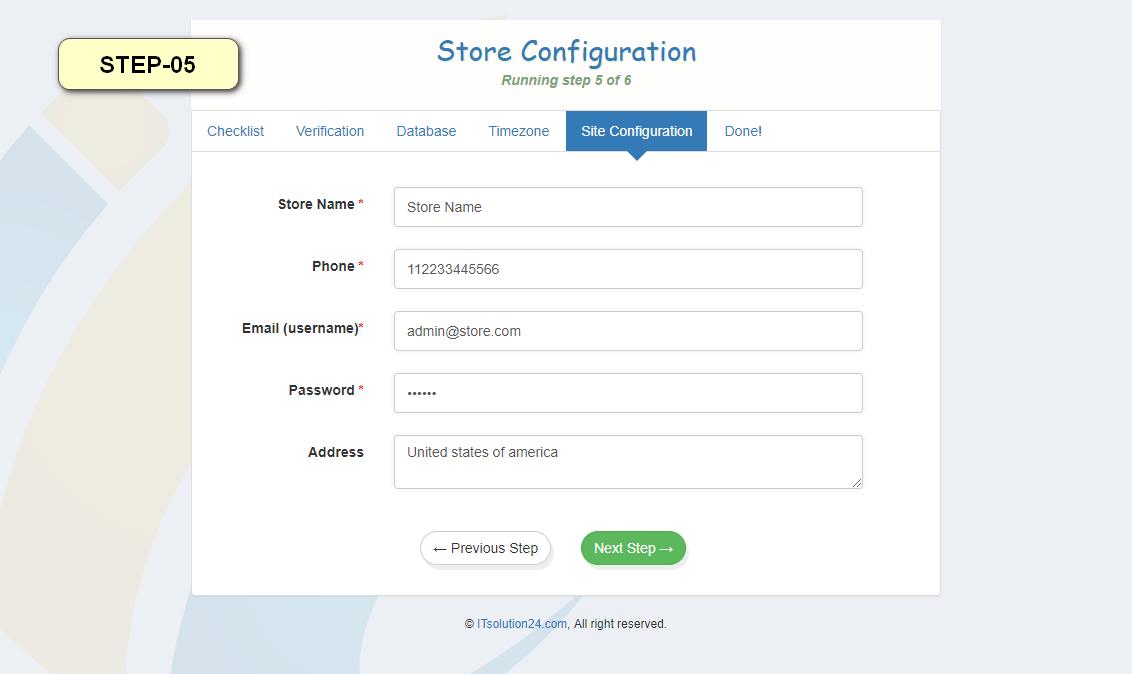
- STEP-06: Your shop management software is ready. Here you will get three(3) user information with login credential. To login click on Login Now button.

Important:if you want to install this application inside custom directory/folder then go to config.php file at line number 61 and change the value of SUBDIRECTORY constant with your custom directory/folder name.
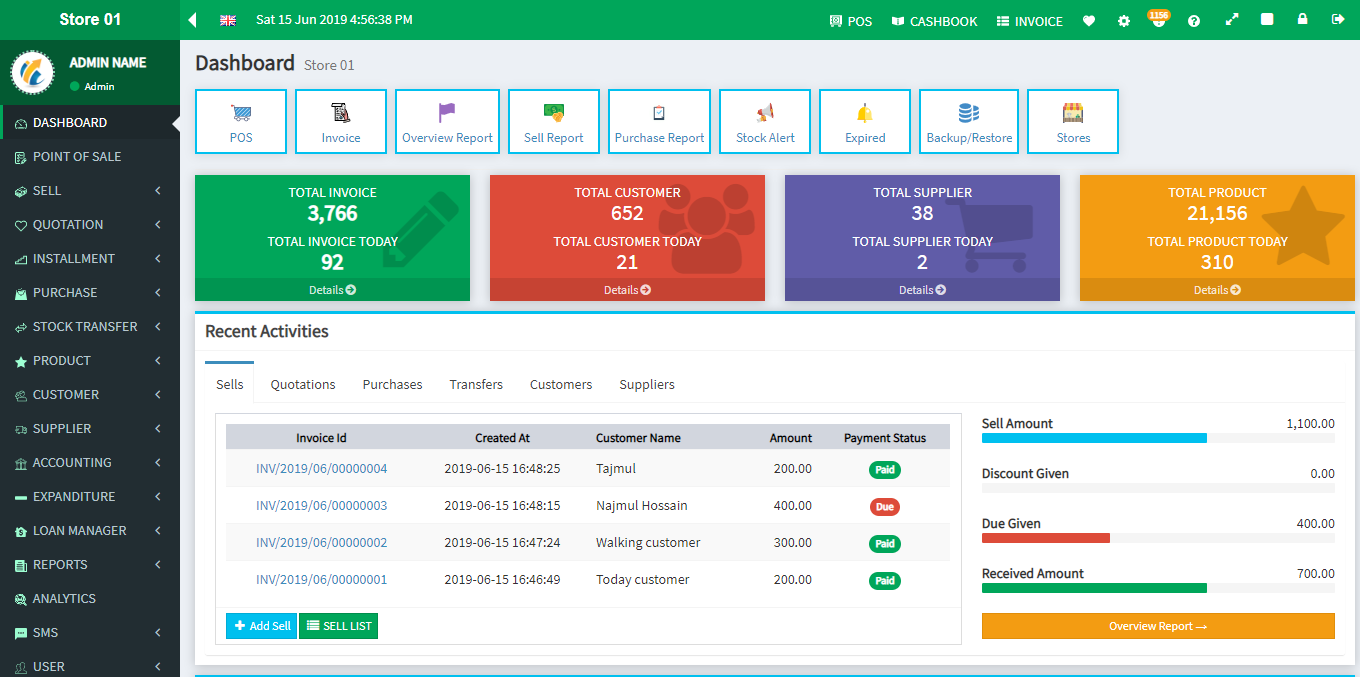
This is the informative Dashboard, From here you will be able to do many work very easily
Dashboard
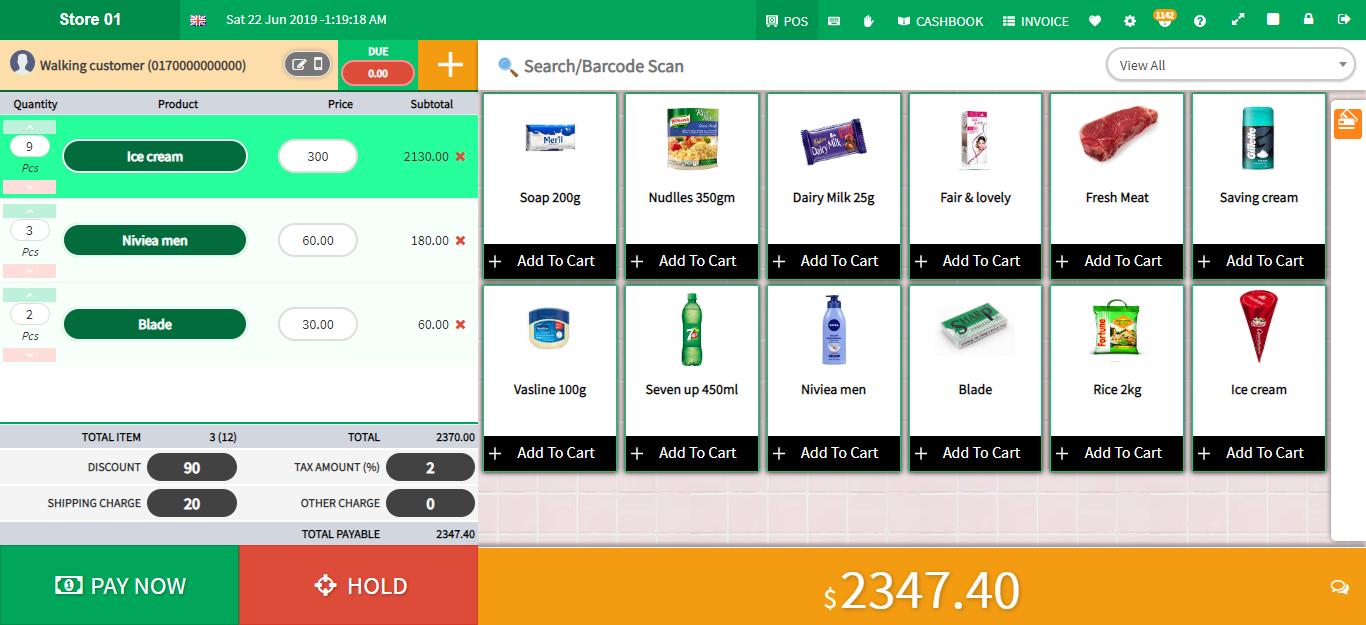
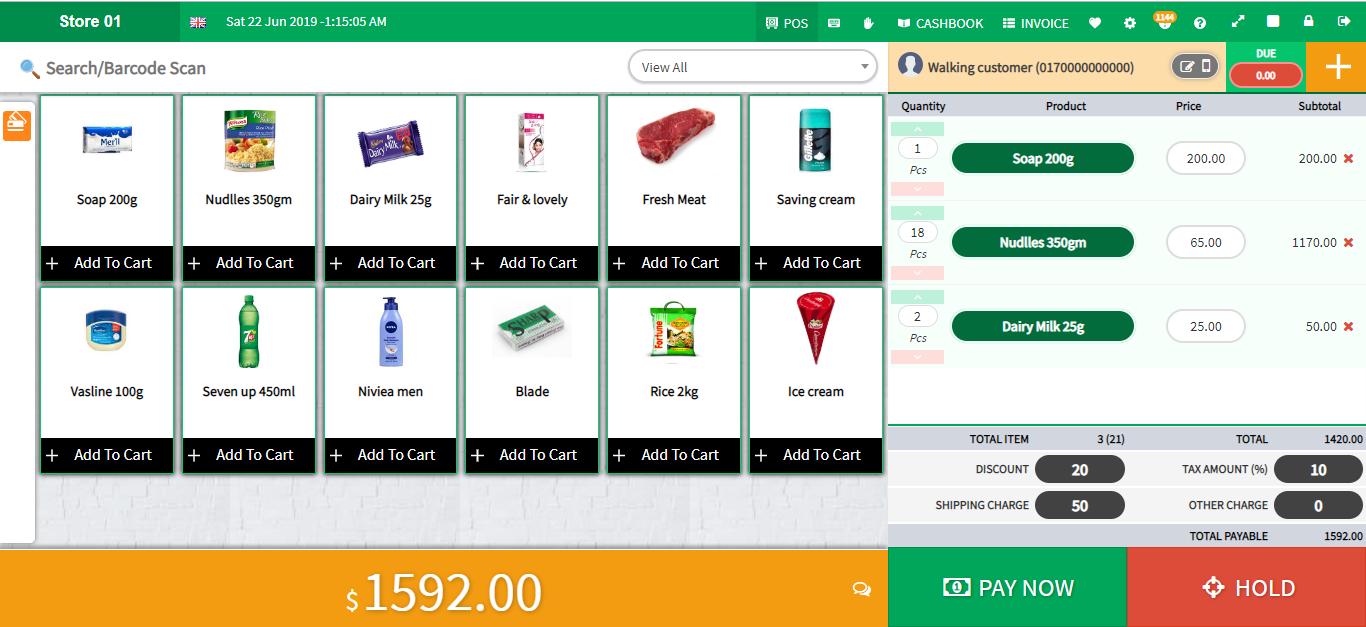
Point of sell
Product sell to the customer
- Dashboard > go to Point of sell from vertical menu or top bar menu.
- After visit point of sell windows select customer first
- Then click on the product from the product list window(click many times, if you want to add more product)
- You can use the barcode scanner (Barcode type [CODE-128, CODE-93 & CODE-39] is tested by a barcode scanner). After complete a scan one (1) product will be added.
- You may scan multiple time for add more number of same product
- You can give different amount of discount for the different user.
- You can give TAX manually.
- After select product and discount and tax click Pay now button
- Then you will be able to see invoice preview. Then fill the received amount and Press Enter.
- Or Click on a payment method that you will use to get the bill from the customer.
- Product successfully sell
- An Invoice will be generated and you will be able to print easily.
- You will be able to use POS printer
- Left Panel
- Right Panel
Sell
Sell List (Invoice List)
In this section, you will be able to see all invoice in your current store. Moreover, if you want to see another day invoice you can see that very easily by filtering the invoice list. For filtering date click on the search icon in the top menu bar
- Here you will be able to see the invoice list in your current store.
- You will be able to see invoice details from here
- You will be able to return product from sell invoice
- You will be able to delete invoice from here
- You can print invoice via POS printer.
Return List
- Here you will get return invoice list.
- Return product name with return quantity.
Sell Log
- Here you will get all log of sell invoice.
- Return product name with return quantity.
Gift Card
You will be able to issue Gift Card to your customer, customer can use that Gift Card for payment. You can also topup customer gift Card.
Advantage of Gift Card
- Customer can use this gift Card like a cash card.
- Customer can top up his card from your shop
- Seller can maintain easily.
Add New Gift Card
- Dashboard > Gift Card > Gift Card List > Click on Add New Gift Card
- Card Number will generate automatically also you can change the card number by click edit icon.
- Give the value of card(This indicate how much you charge to customer for this card)
- Provide how much amount you want to topup of this card.
Gift Card List
- Dashboard > Gift Card > Gift Card List > Here the all Gift Card list that you issued
- For view or print Gift Card click on view button from the list
- For topup money to Gift Card click on topup button and give the amount and expiry date
- You may also edit and delete any Gift Card from list.
Quotation
In this section, you will be able to create a quotation invoice for give a proposal to any customer or any institute
Add Quotation
- Go to Dashboard > Quotation > Add Quotation
- Here you will get from. fill the form with all required field
- Select the customer and select the supplier list to get that supplier product easily.
- Type your product name in Add product section. You can add multiple product
- Click on submit. A quotation invoice will create.
Quotation List
- By click action button you can edit the quotation invoice.
- From quotation invoice list you can view the quotatiton invoice and can print that invoice.
- In the next time you will be able to convert this quotation invoice to sell invoice from action button.
Installment(EMI)
From here you can manage your installment invoice. You can sell a installment payment from POS screen by click sell with installment button.
Create a Invoice as Installment payment
- Goto Dashboard > Point Of Sale > Select the product > Click on Pay Now button.
- You will get a sell with installment button below the FULL PAID or FULL DUE button.
- After click you will a form about the installment period.
- Duration : This indicate how many days you will give to your customer to paid this amount
- Interval: What the interval between first payment to second or third to form.
- Total Installment: It will calculate automatically.
- Interest Amount: If you have any interest amount so give the percentage value.You may use zero(0).
Receive Installment Due
- You can receive installment due from installment list
- Go to Dashboard > Installment > Installment List > Here you will get all list of installment sell.
- Click on view button from a invoice. Here you will get installment list
- Click on Payment button and give the receive amount.
Installment List
- You will get all installment invoice in this section.
- Go to Dashboard> Installment > Installment List > Here you will get all list of installment sell.
- Click on view button from a invoice. Here you will get that installment details
- Here you will get due amount and remaining installment and their payment date.
- When installment invoice paid then status will be paid in installment invoice list .
Installment Payment
- You will get all installment payment in this section.
- Go to Dashboard> Installment > Payment List > Here you will get all payment of installment sell.
Other Payment Function
- Payment Due Today : Here you will get list that you received from installment due.
- Payment Due All : Here you will get all installment due invoice.
- Payment Due Expired : Here you will get all installment due invoice they missed their payment date.
Overview Report
- You will get overview calculation of installment i.e. Total invoice , interest amount, amount received & due amount
Purchase
In this section you will be to able to see lot of information about purchase product(that you were bought from supplier).
Purchase List
- Dashboard > Purchase > Purchase List > Here you will get all list of your purchase from supplier.
- To return product to supplier click on return button from that invoice from list
- You will be able to due paid to your supplier from pay button.
- To get another day invoice you need to click on search icon from Topbar.
Due Invoices
- Dashboard > Purchase > Due Invoices > Here you will get all list of your purchase from supplier that has due.
- You can also paid from this list by click pay button.
Add Purchases
- Dashboard > Purchase > Add Purchases > Here you will be able to buy product from any supplier
- Need to select supplier first and provide the invoice Id.
- Search the product and select from the list and give the buy quantity of product
- Then provide product buy price and sell price
- Give the paid amount (You may take due from supplier)
- Click on Buy Now button
Transaction List
- Dashboard > Purchase > Transaction List > Here you will be able to all transaction with your all supplier
- To get another day transaction list you need to filter from Top bar by click on search icon
Stock Transfer
In this section, you will be able to transfer product form one store to another store.
Add Transfer
- Go to Dashboard > Stock Transfer > Add Transfer
- Here you will get from. fill the form with all required field
- Select the sender store and receiver store
- In stock list section you will get all product list of sender store.
- Click on product from that list for transfer product
- After click that product will add in Transfer list section.
- Click on Transfer Now button for Transfer product
- A successfull messeage will appear if operarion is success.
Transfer List
- Go to Dashboard > Stock Transfer > Transfer List
- Here you will be able to see all transfer from your store
- Here you can change the transfer status of any transfer from your store
- When transfer status will be completed tha time transfer product amount will be added in receiver store.
Product
Every shop may arrange with a bunch of product which contains the product. The software permits to create the products as well as you can edit, delete your creating Product.
Create New Product
To create a product you have to create a box(product location) and supplier(who will supply product to you) first.How to create a box?How to create a supplier?
- Dashboard > Product > fill up the form under "Add New Product" with valid information
- If you have more store(multi-store) you can add this product to all store by click store in the store list from here.
- After successfully creating a new product will be shown under "View All Product Name" section. Here product available amount is Zero (0). Product available amount will increase when you will buy the product from a supplier.
- Buy price and sale price will be needed when you will buy a product from the supplier
Buy Product From Supplier
- Dashboard > Product > All product will be shown under "View All Product Name"
- Click on the Buy button(symbol of plus) of product item > a floating modal window will appear > fill-up this form by providing valid information
- In search product area you will get product list under that supplier only in this modal window pop up.
- Give the quantity, buy price and sale price in that product
- After providing information click on Buy.
- You will get report how much amount you bought from a supplier in buy report area.
Return Product To The Supplier
- Dashboard > Product > All product will be shown under "View All Product Name"
- Click on the Return(symbol with minus) button of product item > a floating modal window will appear > provide invoice ID and Quantity(that amount you want to return)
- After providing information click on Return
Update and Delete a Product
- Dashboard > Product > All product will be shown under "View All Product Name"
- Click on the edit button of a product item > a floating modal window will pop up > change information> update
- Click on the delete button of a product item > a floating modal window will pop up > select the method >delete
Generate Barcode
- Dashboard > Product > All product will be shown under "View All Product"
- Click on barcode icon button under barcode label of a product item > a floating alert window will pop up> select the quantity and choose barcode type (barcode type CODE 128, CODE-39 & CODE-93 tested by barcode scanner)
- Click on Print
- You can use the barcode scanner to select Product in POS screen
Product Import
- If you need to add a lot of products to your shop you may use this method.
- You need to download .xls file and need to fill-up.
- In that .xls file, you will get a demo product(that is used for instruction only) How to?
- After fill-up that .xls file you need to upload here
- After upload > Click Import
Stock Alert
- Dashboard > Product > Stock alert
- Which product stock amount is low, you will see that product list here.
- You will be able to increase the product quantity by click product buy(symbol of plus) from the stock alert list.
Expired Product
- Dashboard > Product > Expired
- In this section, you can see expired product list
Customer
Here you can manage your customer very easily. You will be able to see customer history with all invoice.
Create New Customer
- Dashboard > Customer > fill up the form under "Add New Customer" with valid information > save
- After successfully creating a new customer will be shown under the "Customer List" section.
View Customer History
- Dashboard > Customer > Click eye icon under view button.
- You will be able to see all previous invoice with all information.
- Otherwise, you will get Due information, lifetime invoice number and lifetime buy amount
Edit and Delete Customer
- Dashboard > Customer > All customer will be shown under "View All Customer Name"
- Click on the edit button of a customer item > a floating modal window will pop up > change information > Update.
- Click on the Delete button of a customer item > a floating modal window will pop up > Choose a method > Delete
Supplier
Every shop may arrange with a bunch of Suppliers which contain the product. The software permits to create the Supplier as well as you can edit, delete your creating supplier.
Create New Supplier
- Dashboard > Supplier > fill up the form under "Add New Supplier" with valid information > save
- After successfully creating a new supplier will be shown under the "Supplier list" section
- From supplier list you will be able to buy product by click buy button.
History of Supplier
- Dashboard > Supplier > All supplier will be shown under " Supplier List"
- Click on the view button of a supplier.
- You can see all invoice and more info that you bought from that buyer
- You will get a lifetime history of the supplier.
Edit and Delete a Supplier
- Dashboard > Supplier > All supplier will be shown under the "Supplier List"
- Click on the edit button of a supplier item > a floating modal window will pop up > change information and Click on the Update button
- Click on the Delete button of a supplier item > a floating modal window will pop up > select a method > delete
Accounting
Here you will be able to maintain your Banking accouting system. You can manintain multiple bank account from here
Deposit
- Dashboard > Accounting > Deposit
- Fill-up the informaion
- Click on Deposit
Withdraw
- Dashboard > Accounting > Withdraw
- Fill-up the informaion
- Click on Widthdraw
Transfer Fund
You can transfer to your another bank account.
- Dashboard > Accounting > Transfer Funds
- Select the sender account and receiver account and Fill the all information
- Click on Transfer Now
Transfer List
You can see transfer list to your another bank account.
- Dashboard > Accounting > Transfer List
- Here you will get all transfer list with details information
Transaction List
- Dashboard > Accounting > Transaction List
- Here You will get all bank account transaction in this transaction list.
Bank Account List
- Dashboard > Accounting > Bank Account List
- Here You will get all list of your bank account
- For add new bank account click on Add New Bank Account and Fill-up the all information
Income Source
- Dashboard > Accounting > Income source
- Here You can add income source
- For add New Income Source click on "Add New Income source" and Fill-up the all information
Income Monthwise
- Dashboard > Accounting > Income Monthwise
- Here You can see how much amount you were earned from different income source
Income & Expense
- Dashboard > Accounting > Income & Expense
- Here You will get a report about Income and Expense
Profit & Loss
- Dashboard > Accounting > Profit & Loss
- Here You will get a report about Profit & Loss, You will be able to filter this report
Cashbook
- Dashboard > Accounting > Cashbook
- You need to entry opening balance of your present day.
Transaction List
- Dashboard > Accounting > Transaction List
- Here you will get details of all transaction like . sell transaction , buy transaction , bank deposit transaction and bank withdraw transaction.
Balance Sheet
- Dashboard > Accounting > Balance Sheet
- Here you will get overall report of your bank accounts
Expense
Here you will get information about expense about your shop like Shop rent, Electricity bill, and Tea bill etc.
Add a Expense
- Dashboard > Expense > Add Expense
- Fill out the form by providing valid information.
- Save
Expense List
- Dashboard > Expense > Expense list
- Here you will get all expense list based on your filtering.
- Expense report will be displayed in the final report.
Category
- Dashboard > Expense > Category
- Here you can create expense category.
- Expense category will be displayed in the Add New Expense section.
Summary
- Dashboard > Expense > Summary
- Here you will get expense summany.
- Expense will show as category with day, week ,month and year wise
Loan
Here you can manage loan that you will get from any bank or any other institute to extend your business.
Take a Loan
- Dashboard > Loan Manager > Take Loan
- Fill out the form by providing valid information.
- Click on SAVE for take loan
Loan List
- Dashboard > Loan Manager > Loan list
- Here you will get all expense list based on your filtering.
- From list you will be able paid loan amount
- By click view button you will get loan paid history
Loan Summary
- Dashboard > Loan Manager > Loan summary
- Here you will get summary report about your loan
Report
You will get a lot of reports from here like Overview Report, Sell report, Buy report, Due report, Payment report, Stock report(this will help you to get a day month or year overview)
Overview Report
- Dashboard > Reports > Overview report
- You will get an Overview report information with Profit, sell amount, Tax collection amount, discount amount and many things in a day, month or year(Depends on your filtering)
Collection Report
- Dashboard > Reports > Collection report
- Here you will get Staff wise collection amount from the customer
- You may filter any date. (filter icon present in the top menu bar with search icon)
Due Collection Report
- Dashboard > Reports >Due Collection report
- Here you will get due collection report
- You may filter any date. (filter icon present in the top menu bar with search icon)
Supplier Due Paid Report
- Dashboard > Reports >Supplier Due paid
- Here you will get supplier due payment report(that you paid)
- You may filter any date. (filter icon present in the top menu bar with search icon)
Sell Report
- Dashboard > Reports > Sell Report
- You will get a product list with the number of sales in a day, month or year(Depends on your filtering)
Purchase Report
- Dashboard > Reports > Purchase Report
- You will get daily, monthly, yearly(Depends on your filtering) wise Purchase report(that you will buy from the supplier)
Sell Payment Report
- Dashboard > Reports > Sell Payment Report
- Here you will get sell payment report(that you received from customer)
- You may filter any date. (filter icon present in the top menu bar with search icon)
Purchase Payment Report
- Dashboard > Reports > Purchase Payment Report
- Here you will get purchase payment report (that you paid to supplier)
- You may filter any date. (filter icon present in the top menu bar with search icon)
Sell Tax Report
- Dashboard > Reports > Sell Tax Report
- Here you will get sell tax report (that you are collect form customer)
- You may filter any date. (filter icon present in the top menu bar with search icon)
Purchase Tax Report
- Dashboard > Reports > Purchase Tax Report
- Here you will get purchase tax report (You were paid to your supplier)
- You may filter any date. (filter icon present in the top menu bar with search icon)
Tax Overview Report
- Dashboard > Reports > Tax Overview Report
- Here you will get purchase tax report (You were paid to your supplier)
- You may filter any date. (filter icon present in the top menu bar with search icon)
Stock Report
- Dashboard > Reports > Stock Report
- You will get the Stock report(that product reserved in your shop)
- You will get product quantity with the supplier
- You can calculate the total number of product in your shop
Analytics
You can see an overview analysis of your shop
- Dashboard > Analysis
- Here you will get Today's profit, weekly, Monthly, and yearly top product, and Best customer and many things.
- You will get a graph about your income & expese in current month
- You can get a lot of info by seeing this graph

SMS
You can send SMS to your customer after create a invoice (Automatically or manually) also you will be able to send SMS to another person
Send SMS
- Dashboard > Send SMS
- Here you will get two type SMS facilty Single SMS & Group SMS
- For single SMS : give Mobile number & text and click on SEND button.
- For Group SMS : Select people category , Campaign name i.e. New Year Greetings, and Schedule date and time (It indicate SMS will send that time), You will get a list in people section according go people category, Write your messege in Message area (don't clear the Hellow,[name] area)
- Click on SEND button
SMS Report
- Here you will SMS report in details
SMS Settings
- According to SMS service provider fill-up the required filed, We are support these SMS gateway: Clickatell, twilio , msg91, OnnoRokomSMS.
- Click on Update
User
You can create some user for maintaining your shop.here you will get many groups of user like some user group user can show customer list only and some user can sell your product to the customer only. It depends on your permission.
Create New User
- Dashboard > USER > user > fill up the form under "User list" with valid information > save
- A user will log in by using their e-mail address.
- After successfully creating new user will be shown under "User list" section
Edit and Delete User
- Dashboard > USER > User > All user will be shown under "User list"
- Click on the edit button of a user > A floating modal window will pop up > change information > Update.
- Click on the delete button of a user > a floating modal window will pop up > Choose a method > Delete
Password Change of User
- Dashboard > USER > Password > click here for change password
- Select the user and give the new password
- Update
Create New Usergroup
- Dashboard > USER > Usergroup > fill up the form under "Add New usergroup" with valid information > save
- After successfully creating new user will be shown under "Usergroup list" section
Edit and Delete Usergroup
- Dashboard > USER > Usergroup > all user will be shown under "Usergroup list"
- Click on the edit button of a user > a floating modal window will pop up > change information > Update
- Click on the delete button of a user > a floating modal window will pop up > Choose method > Delete
Give Permission
- Dashboard > USER > Usergroup > All user will be shown under "Usergroup list"
- Click on user group edit permission > a floating modal window will pop up > check the permission from permission list that you want to provide that group of user.
- Click Update button
Filemanager
All file will be present here, you will be able to manage all media files.
Setting
Here you will be able to add payment method currency and user preference and many things.
If you have more shop and if you are interested to manage more shop by using this software, it's completely possible and very easy
Create new store
- Dashboard > Settings > Store > Add Store
- Fill the form by provide valid information
- Save
Select a Store
- Dashboard > Settings > Store > Store List
- Here you will get all store list
- From that list click on active that you want to visit
- After successfully activate you will be able to see all the information in your activated shop
Receipt Template
Here you can redesign your invoice by edit code like any text and text color.
- Dashboard > Settings > Receipt Template
- Selected template design will be generate when invoice will be create.
- Click on template name and after click on template you will able to see two section of code,You can edit this for customize your invoice design.
- In the bottom section you will get many template tag, You can use this key for sow that property in your invoice.
- Save
User Preference
- Dashboard > Setting > User preference
- Select language, color theme, POS panel position, and POS window pattern
- Update
Brand
- Dashboard > Setting > Brand
- From here you can add brands name when you will crate a product.
- From brand list you can update or delete any brand.
Create New Currency
- Dashboard > Setting > Currency > Add New Currency
- Fill out the form by providing valid information.
- Save
- After successfully creating new currency will be shown under "currency list" section.
Activate Currency
- Dashboard > Settings > Currency > All currency will be shown under "Currency list"
- Click on the activate button and confirm
Edit and Delete Currency
- Dashboard > Settings > Currency > All currency will be shown under "Currency list" section
- Click on the edit button of a currency > a floating modal window will pop up > change information of currency > Update
- Click on the delete button of a currency > a floating modal window will pop up > Choose method > delete
Add New Payment Method
- Dashboard > Settings > Payment method > fill up the form under "Add new payment method" with valid information
- Save
Edit and Delete Payment Method
- Dashboard > Settings > Payment method> all payment method will be shown under "Payment method list" section
- Click on the edit button of a payment method > a floating alert window will pop up > Click on Update
- Click on the Delete button of a payment method > a floating alert window will pop up >choose method > Click on Delete
Unit
Unit means product unit i.e. Kg,piece. You can add unit when you will create a product or update. product unit will be show in invoice.
- Dashboard >Setting > Unit
- Give the unit name.
- Save
Tax Rate
This Tax Rate is based on product. so you can select a Tax Rate when you will crate a product or update a product.
- Dashboard >Setting >Tax Rate
- Fill the required information
- Save
Create Box
The box is important for every product, Box indicates the position of a product. You may call it box or Shelf (Where a product is located in your shop)
- Dashboard >Box > Add New Box
- Give the box name(Location, Shelf shortcode or section name) and details.
- Save
Printer Add
If you want to use POS printer so this is for you. If you are not intested to use POS printer so just avoid this section.
- Dashboard > Settings > Printer > Add New Printer
- Give the all information
- Name: Give the title of your printer(Just name)
- Type: Select the network type
- Character per line: give the number of charcater that will print in a line on invoice
- IP Address: Provide the IP address of your printer like 192.168.223.501
- IP Address: Port of your printer use. (Most printer uses 9100 port)
- Click on Save
- After adding a printer go to store settings and select POS printer and choose print will be automatically or not.
Backup Data
- Dashboard > Settings > Backup/restore > Backup tab
- Click on Export button
- An SQL file will download in your computer
- Store this SQL file very carefully
- Your shop data successfully backup.
Restore Data
- Dashboard > Settings > Backup/restore > Restore tab
- Click on Import button
- Select your previous backup file(.sql)
- After select restore process will start. It may take several minutes.
- After complete restore process, A confirmation message will appear.
FAQ
01. How to synchronize offline to online ?
Pre-Requirements
- - ROOT/storage/logs/sql.txt [check that this file is exists and writable]
Follow this steps
- 1st : Copy offline script to online server
- 2nd : Copy/Import offilie database to online server
- 3rd : Change config.php as the following
- 4th : define('SYNCHRONIZATION', true); in config.php
- 5th : define('SYNCSERVERURL', 'http://remotemodernpos/sync.php'); [adjust as your server configuration] in config.php
- 6th : Make sure storage/logs/sql.txt file is exist and writable
- 7th : Crate a schedule task / cron job:
C:/xampp/php/php.exe -f D:/www/modernpos/cron.php PUSHSQLTOREMOTESERVER How to?
***Note: C:/xampp/php/php.exe and D:/www/modernpos/cron.php [will be changed according to your server configuration]
02. How to create a cron job / Schedule task ?
Follow this steps:
- Run > Task Schedular
- Create Task
- General
- Name = MPOSSynchronization
- Run Wheather user is logged on or not [checked]
- Do not store password [checked]
- Run with highest privileges [checked]
- Hidden [checked], configure for [select as your need]
- Triggers
- New Daily Repeat task every 1 minutes
- OK
- Actions
- New Action = Start a program Program/Script = C:/xampp/php/php.exe [change as your need] Add agruments(optional) = -f D:/www/modernpos/cron.php PUSHSQLTOREMOTESERVER
- click on OK
- click on OK
- Right click on The Task and click on RUN > Status will be changed to Running
03. How to backup database automatically ?
Follow this steps
- First: Open the config file at root: config.php.
- Adjust the value of DIR_BACKUP as your need, by default it is poinging to storage/backups directory...
- define('DIR_BACKUP', DIR_STORAGE.'backups/');
- Note: It's recommended to shift the storage directory to another location, i.e. if you have installed the system under D://www/modernpos then the storage directory can be located at D://www/storage
- Second: Crate a schedule task / cron job, How to?
- C:/xampp/php/php.exe -f D:/www/modernpos/cron.php DBBACKUP
- Note: C:/xampp/php/php.exe and D:/www/modernpos/cron.php [will be changed according to your server configuration]
04. How to restore database ?
Follow this steps
- Dashboard > System > Backup/Restore
- Click on restore tab
- Select your database
- Click on Restore.
05. How to solve datatable warning ?
Follow this steps
- Open the config file at root: config.php
- Change the value of define(‘SUBDIRECTORY’, ’’);
- Prodvide the subdirectory name: define(‘SUBDIRECTORY’, 'YourFolderName');
- define(‘SUBDIRECTORY’, 'YourFolderName');
06. How to add a new language ?
Follow this steps
- Dashboard > System > Language > Add New Language
- Visit the page that you want translate.
- After visit that page all language will add that new language section.
- Now click on translate button beside of each language key
07. How to add a POS printer ?
Follow this steps
- Dashboard > Settings > Printer > Add New Printer
- Give the all information
- Name: Give the title of your printer(Just name)
- Type: Select the network type
- Character per line: give the number of charcater that will print in a line on invoice
- IP Address: Provide the IP address of your printer like 192.168.223.501
- IP Address: Port of your printer use. (Most printer uses 9100 port)
- Click on Save
- After adding a printer go to store settings and select POS printer and choose print will be automatically or not.
08. How to customize invoice receipt template ?
Each template has two parts (I)Content [contains HTML markup with template tags] (II) CSS [For style].
- Dashboard > System > Receipt Template > Template list
- Update HTML part & css as your wish.
09. How to use Template tags & Where i will get template tag ?
- Dashboard > System > Receipt template > scroll down > Here you will get all template tags
- You must wrapp template tag with double curly braches, i.e. {{ store_name }}
10. How to use loops ?
- Items Loop Tags. Usage:{{ items }} {{ sl }} {{ /items }}
- Return items Loop Tags. Usage:{{ return_items }} {{ sl }} {{ /return_items }}
- Payments Loop Tags. Usage:{{ payments }} {{ sl }} {{ /payments }}
- Taxes Loop Tags. Usage:{{ taxes }} {{ sl }} {{ /taxes }}
11. Why image is not show in product ?
- Open the config file at root: config.php
- adjust filemanager directory/folder and filemanger URl
12. How to reset data ?
- Dashboard > Sytem > Data Reset
- Check store from store list.
- Click on "Yes" for reset data of selected store
12. How to update v2.0 to v3.0 ?
- Please follow this article Click Here
12. How to import product ?
The first line in downloaded .xls file should remain as it is. Please do not change the order of columns. Please make sure the (*.xls) file is UTF-8 encoded. The images should be uploaded in storage/products/ (or where you pointed) folder. The System will check that if a row exists then update, if not exist then insert.
SL = Serial Number
- The value of this column will be 1,2,3....10000
ProductName
- The product name here...
ProductType
- Now two types of product are supported
- standard
- service
Code
- Enter only numeric value
- This code will be uses for barcode scanner
- This code must be globally unique
HSNCode
- Only for Indian GST
BarcodeSymbology
- code25
- code39
- code128
- EAN5
- EAN13
- upca
- upce
StoreCodeNames
- Code names of any store to where you want to insert the product
- The code will be found here
- http://yourdomain/modernpos/admin/store_single.php
- General tab
- Code Name
- Code name must be comma seperated like this- store1,store2,store3
CategorySlug
- Dashboard > Product > Category List > Click on 'Edit Button' > Category Slug
UnitCode
- Dashboard > System > Unit > Click on 'Edit Button' > Code Name
TaxRateCode
- Dashboard > System > Taxrate > Click on 'Edit Button' > Code Name
TaxMethod
- The value will be one of the followings 1) inclusive or 2) exclusive
SupplierCode
- Dashboard > Supplier > Supplier List > Click on 'Edit Button' > Code Name
BrandCode
- Dashboard > System > Brand > > Brand List > Click on 'Edit Button' > Code Name
BoxCode
- Dashboard > System > Box > Click on 'Edit Button' > Code Name
AlertQuantity
- If the product quantity is equal or bellow the alert quantity then an alert will be shown
CostPrice
- Cost price of the product
SellPrice
- Sell price of the product
Description
- Brief description of the product
Status
- If the product will be published or not
Thumbnail
- Image thumbnail of the product
Images
- Multiple image links, will be seperated by pipe (|) like this /image1.jpg, /image2.png, /image2.gif
Important Notes:
in config.php
- When FILEMANAGERPATH will be pointed to storage then
- /image1.jpg will search image under posroot/storage/image1.jpg foler
- /products/image1.jpg will search image under posroot/storage/products/image1.jpg
Tested Feature
We Tested this feature
POS Printer
- supported this type POS printer
Barcode scanner
- We have tested bacode scanner.
- Supported barcode type: CODE 128, CODE-39 & CODE-93.
How to use Barcode scanner
- First : Plugin barcode scanner to computer
- Second : Go to POS page and scan the barcode from product label
- ** Be ensure need to scan that you were add when you were add this product
Indian GST
- For use Indian GST go to store setting and change the invoice view setting from standard to Indian GST.
- Indian GST support with all feature (IGST,CGST,SGST)
Credits
We've used the following images, icons or other files as listed.
JS File
- Bootstrap - Most popular HTML, CSS, and JS framework under MIT License
- jQuery - A fast, small, and feature-rich JavaScript library under MIT License
- Barcode reader - under LGPLv3.
- Moment.js - Moment.js is freely distributable under the terms of the MIT license.
- Bootstrap-timepicker - Time picker widget based on bootstrap under Apache License V2
- Bootstrap-Datepicker - Date picker widget based on bootstrap under Apache License V2
- Accounting.js - A tiny JavaScript library for number, money and currency formatting under MIT License
- Angular JS- Under MIT license
- Angular Filemanager- Under MIT license
- select2 - Under MIT license
- Jquery UI- Under MIT license
- sweet alert- Under MIT license
- AdminLTE - Under MIT license
- toastr - Under MIT license
- morrish - Under MIT license
- Underscore JS -Under MIT license
- Filemanager JS - Under MIT license
- perfect scroll bar - Under MIT license
- Datatables jQuery Plugin-Under MIT license
- jQuery chart js- Under MIT license
- Bootstrap-wisi html5- Under MIT license
PHP
- PHP spreadsheet reader - Under MIT license
- ESC/POS print driver for PHP- Under MIT license
- PHP hooks-
- PHP mailer- Under the LGPL 2.1 license.
- PHP barcode generator- Under the LGPL 3 license.
- PHP QR Code- Under the LGPL
Other
- Flaticon
- Font Awesome -The iconic font and CSS toolkit under GPL License.
- animate css- Under MIT license
- Pixels.com
- Background Music:For vedio preview
- Audio sounds
Once again, Thank you so much for purchasing this php script. As we said at the beginning, we'd be glad to help you if you have any questions relating to this theme. No guarantees, but we'll do our best to assist. If you have a more general question relating to the items on Codecanyon, you might consider visiting the forums and asking your question in the "Item Discussion" section.
ITsolution24.com